Diamonds are a Girl's Best Friend.

Welcome to the grand finale of my latest restoration!  I spent Friday trekking to my friend's to retrieve my diamond chair, now all welded and super shiney in it's gloss black powder coat finish.  I started the trip by swinging by WXPN's free at noon because it is totally free and a great place to hang out when in Philly on a Friday!  ​I almost talked myself out of stopping for foam thinking I could fill with cotton I already had. As I was waiting to get on my ramp to cross town I realized that was a dumb move as the supplier I go to in Philly is a wholesaler and if I get home and decide my cotton idea sucks, my only choice is Joann's and that place is overpriced with a not always stellar selection.  So I got off 676 at 8th and headed to Katz's Upholstery.  I decided on 1/2" foam and got 2 yards.  I took my roll and headed to NJ.  My friend was at work so I collected my chair, left him a Vanagon part I picked up for him the night before at our local supplier, used the restroom and headed to an estate sale he tipped me off about.  Due to my slow recent sales and our strike situation, I was not in the market for much but I did snag 2 pair of vintage Sears binoculars and a cool melmac ash tray.  

I left town with a kick ass cherry pie and headed back to PA, just in time to take my kids to a dance at their school.  ​Of course I was thinking about my chair while my kids were dancing to 'shake it off' but the work would have to wait!  

Saturday I got to work on the cover.  Over the last week I opened the seam maybe 12" or so, then dumped out the powdered foam, scraped as best as I could at what was stuck to the fabric inside and washed in the tub by swishing in cold water with a mild detergent and rinsing a few times.  I did test the fabric and it is indeed wool.  I hung over the side of the tub to dry so as not to stretch the fibers.  

Washing the cover.  Yuck, eh? 

Washing the cover.  Yuck, eh? 

My first step was to cut the foam.  Remember, I am using in a 3-D contoured situation, so I realized I would need to compensate.  I started by cutting the left side to match the side of the chair.  Using a bag of flour to weight the seat down, I followed with the right side. There is excess foam now that needed to be removed so I decided I would cut a V out and the center top and bottom, then spray adhesive to close it up.  ​

Removing the foam excess to contour the seat. 

Removing the foam excess to contour the seat. 

My spray adhesive idea worked well once the glue started getting tacky.  I placed the foam inside and evaluated.  I thought a little cotton would help fluff it out a little so cut a piece the width of the chair and put on top of the foam.  The kids tested and said yes, the chair was comfy and they loved it!   

Kid tested. 

Kid tested. 

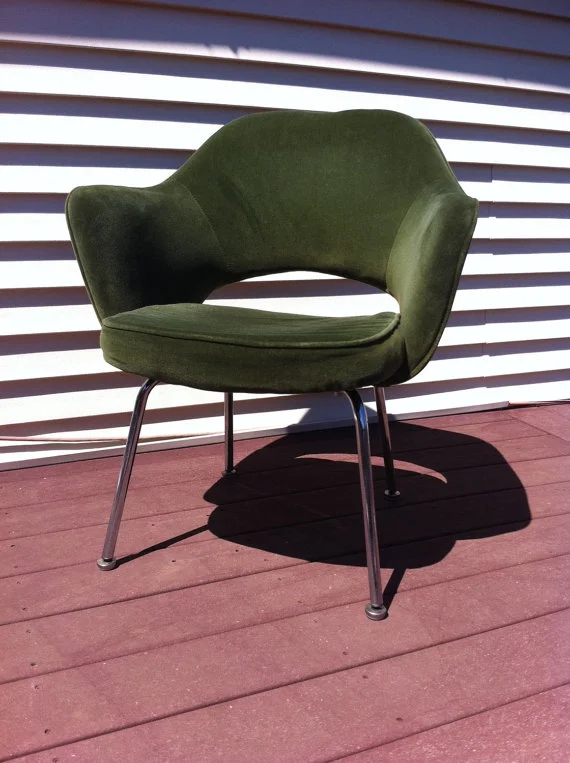
So this morning I got to work sewing it all back up and then took my pics.  I did decide to list the chair because I have a lead on another I could repeat this on and would like to save it if I find a home for this one.  So here are some pics, see listing on etsy for more details if you are interested and please send friends! If you know anyone looking for furniture and appreciates my era, please send them to my shops!  I would greatly appreciate the referrals! ✌🏼️  Thanks a bunch and thanks for all your support!  I had a great April in the mall!  Xo Malissa https://www.etsy.com/listing/279478194/knoll-harry-bertoia-large-diamond-lounge


Naked.  Look at her shine! 

Naked.  Look at her shine! 

In her threads. 

In her threads. 

Besides the foam deterioration, the cover is in great condition!  Charcoal wool with some orange ombré into white threads through like stripes.

Besides the foam deterioration, the cover is in great condition!  Charcoal wool with some orange ombré into white threads through like stripes.

The shock mounts were cleaned and conditioned.  They would be expensive to replace but luckily, these are still in great condition.   

The shock mounts were cleaned and conditioned.  They would be expensive to replace but luckily, these are still in great condition.   

Original label dates this to the 50's.  I suspect this is an early production chair.  So happy I could help it get ready for it's next 70 years! 🎉 

Original label dates this to the 50's.  I suspect this is an early production chair.  So happy I could help it get ready for it's next 70 years! 🎉 

One down....one to go!

I have reached the point in the project where I feel comfortable listing in advance!  I just finished the first Eero Saarinen chair and will be starting the demo of chair #2.  I already cut the seat foam so it should go pretty quick.  I hope to have it finished this week.  Please message me to hold them for you!  I priced at $600 for the pair, which his seriously well under others without repairs.   Shipping is additional and I will quote for you to your nearest Greyhound station.  Delivery and meet up in my region (eastern/central PA, NJ areas) is always welcome if we can arrange it. 

I'm comfy again!  Soft new foam and ready to rock!

I'm comfy again!  Soft new foam and ready to rock!

I love Elmer's Spray Adhesive!  I even glued the Knoll sticker onto my new dust cover!

I love Elmer's Spray Adhesive!  I even glued the Knoll sticker onto my new dust cover!

In the shop: Knoll Eero Saarinen Executive Arm Chair demolition.

I have started on the Knoll Eero Saarinen chairs.  Demolition is always fun, but I approach it cautiously as it can be a Russian Christmas Present.  :)  I bought these chairs with bad degraded seat foam, and unlike sellers who just flip things, I will take the time to fix it before I sell it.  The Dunbar chairs had foam in similar condition.  Basically, it hardens and dries out over the years.  Did you ever check out an upholstered piece at a thrift or yard sale?  Do you know what signs of deterioration to look for?  There are pieces out there that exist all of these years and are still usable, but certainly, they are not common.  The first thing I do when I check out a piece is take a good look.  What can I see?  Certainly any sagging or repressed areas are clues.  The seat fabric on these chairs were showing sagging around the front edge.  The other big clue, is to look for powder.....any sign that the foam inside has turned to dust.  You may not notice it right away, but turn the chair over if you can, check out any seam holes as that is where it would fall through.  Shake it up a bit if it's small enough and see if you hear anything or see the dust coming out.  If you see that, I can guarantee you have foam issues. 

Saggy seats are a good indicator that you have some foam issues going on.....

Saggy seats are a good indicator that you have some foam issues going on.....

When I started disassembling, I put a cardboard sheet on the ground to make clean up easier and keep the mess intact. I bought a little tool for pulling tacks and staples up at JoAnn Fabrics and it is proving itself very useful in my projects.  I pulled out the dust cover staples first, then started on the velvet.  Dumping out the mess as I worked my way around.  Once the whole thing was apart, as expected, the original foam was glued to the bent ply seat.  I pretty much attack this by hand and pull off as much as I can.  Then I take the random orbital sander to clean up the wood and smooth it out. 

I am now working on the foam and getting it to look like I want before finishing and stapling back up.  I have used 2" high density foam, but because of the curved seat, I'm not sure I'm liking it not looking fluffier so I am taking my time to make my plan.  I have to be careful as not to make any tears in the velvet since I am not replacing the original fabric.  I will keep you posted as they come along!!!!  Don't miss out on the fabulous items I have in stock now!  Message me for a shipping quote or to arrange a regional delivery!  xo Malissa